Showing posts with label baby jane. Show all posts

Tuesday, August 1, 2017

Back to work!

After a long hiatus, my original Baby Jane went back under the quilting machine yesterday. I'm hoping to work on her a little each day.

I've been a little hesitant about this quilt because I made the mistake of jumping right into quilting her when I bought my new Handi Quilter Sweet 16. It was NOT a good idea to use this quilt as a practice quilt and I was quite upset with myself for a long time.

After assessing the situation yesterday, I decided that it's not as bad as it looks. It's amazing what a difference a little time can make.

Onward and upward!

Friday, December 19, 2014

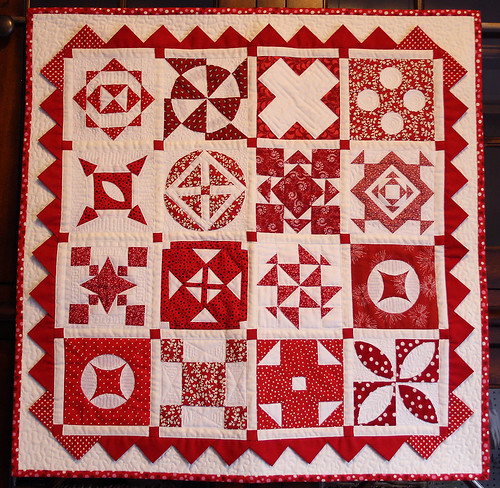
The Red & White Mini Baby Jane

I've been waiting since October for a nice day to take photos of this little quilt but it just hasn't happened. Winter in Seattle...
Today I decided to just go for it. Better photos can always be taken later.
Red & White Mini Baby Jane
If you follow the blog you may remember my original layout back in September.
I changed it up a bit and decided to use prairie points in the border. I have a thing for prairie points these days.
Oh and BTW, the little quilt won 3rd place in the miniatures category in the quilt show. It's 24" x 24" in size.

Wednesday, December 2, 2009

LS-5

We're a little behind on triangles, I think.  Let's have a little triangle marathon...

Print or trace the block diagram onto foundation paper, number, and cut as in the photo.
Note that the top section of the triangle is not included here.
The lines on the section with the half circle have been extended to allow for foundation piecing.  We will applique the half circle on later.
Remember to change the block size to 5" x 8" if you're printing from the software.

Foundation piece all the numbered sections and trim the seam allowances to 1/4".

Complete the three block sections by sewing the two sections of each together.

Applique the little half circle.  Remember to add the seam allowance at the top so it can be sewn into the seam.

Sew the three pieced block sections together.

Create the top block section by appliqueing the two triangles.
When I did the Rainbow Jane block, I used regular applique and for this block reverse applique because I had trouble getting the point of the tall triangle sharp.
I'm not sure which is better.

Sew all the block sections together.
LS-5

Friday, November 6, 2009

J-9

I had this block all finished except for the applique. It got dark while I was trying to get that done so I could post a block on time for a change. Darn.

Out of background fabric, cut:
two strips 1 1/8" x 2.5"
two strips 1 1/8" x 3.75"

Out of main block fabric, cut:
one square 2.5" x 2.5"
one strip 1 1/8" x 3.75"
two strips 1 1/8" x 4 3/8"
one strip 1 1/8" x 5"
Sew a 1 1/8" x 2.5" background fabric strip to the top and bottom of the main fabric square.

Sew a 1 1/8" x 3.75" background fabric strip to each side of the resulting sections.

Sew the main fabric strips to this section log cabin style, starting with the shortest one on the top and moving clockwise.

Applique the four little melons into position.
J-9

Tuesday, September 15, 2009

F-7

My fall cleaning seems to be taking over my life over right now, so I apologize for the tardiness of this block. It's becoming a habit, but there are still two blocks a week. I hope you don't mind.

Print or trace the block diagram onto foundation paper, number, and cut out as in the photo.

Foundation piece all the numbered sections. Trim the seam allowances to 1/4".
Out of main block fabric cut:
1 strip 5" x 1"
2 strips 4.5" x 1"

Sew the two center block sections together.

Attach the top and bottom section.

Referring to the block diagram sew on the border strips log cabin style.
F-7

Tuesday, September 8, 2009

RS-6

If you've been following this blog for a while, you know that I have a serious aversion to set in seams.
Well, yesterday I met my nemesis. There was no avoiding them. This would have been a lot of applique...

Trace or print the block diagram onto foundation paper, number, and cut out as below.
If you're printing, remember to change the block size to 5"x8"!
(Do not foundation piece number 7 (the diamond) in the bottom right section. It won't work. Cut the diamond out separately. I only realized this when I started piecing.)

Foundation piece all the sections and trim the seam allowances to 1/4". It is important to be accurate on this when sewing inset seams. I marked some of my seam allowances with a disappearing marker and then cut on the line.

Complete the center section of the block by sewing the three pieced sections together.
TIP: One secret of set in seams is not to sew into the seam allowance when piecing the individual sections. When foundation piecing this is hard to do, so I just used my seam ripper to undo where I'd sewn into the seam allowances.
I'm planning a tutorial on set in seams and will update this post when I do, but in the mean time, the instructions for block B-9 may help a little.

Sew the top block section to the center section.

Cut the center bottom diamond out of background fabric and sew it in between the two bottom sections. Attach it to the one section first and then the second.

Sew the two block sections together.
RS-6

Thursday, August 27, 2009

LS-2

Triangle time!

Print or trace the block diagram onto foundation paper, number, and cut out as in the photo.

Foundation piece all the numbered sections.
If you're not using freezer paper for foundation piecing, trace the top triangle section of the block onto the dull side of freezer paper and cut out. Cut out the center diamond.
Cut a 3" x 4" section out of background fabric and iron the freezer paper shape to the right side. Cut out the center diamond leaving a small seam allowance. Clip into the seam allowance on all four corners of the diamond.

Cut a section at least 1/2" larger on all sides than the center diamond in the top section of the block out of main block fabric. Lay this right side up on the table. Place the fabric with the freezer paper right side up on top of this and baste through all layers.

Reverse applique the diamond.

Trim the top section to size, using the freezer paper as a guide. (Trim 1/4" from the freezer paper on all sides.) Also trim away the excess main block fabric from the back.
Sew the two top sections of the main block section together.

Sew the triangular sections to the bottom.

Sew the top triangle to the top and the bottom section to the bottom of the block.
LS-2