
I'm going to show you the method for appliqueing stems that I learned in Houston. I'm a little rusty but trust me, you can make REALLY skinny stems using this method. I amended it a little.
The markings on the fabric do not show well in the photos. I hope you can see them. And I'm left handed, so everything will probably seem the wrong way round.
But I think you'll get the idea.
First, we'll do the foundation pieced part.
Print or trace the block diagram onto foundation paper, number, and cut out the bottom two sections as in the photo.


Cut a 4" x 6" rectangle out of background fabric and mark the outlines of the handle, as well as the four corners of the block section onto the right side.

Cut a 1.5" wide strip about 10" long out of main block fabric ON THE DIAGONAL.
On the right side of the fabric and using a disappearing or washable marker (the lady in Houston just used a regular pencil) draw two lines 3/8" (the width of the handle) apart in the center of the fabric strip.

Finger press along these two lines toward the wrong side of the fabric.

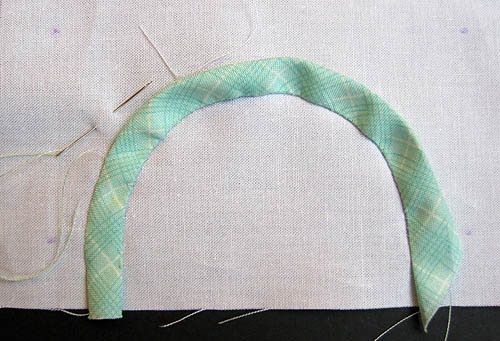
We're going to applique the inside edge first. Lay the fabric strip onto the background fabric rectangle so that the main fabric strip extends beyond the end of the handle markings by about 1/4" (into the seam allowance). This will allow the edges to be caught in the seam when you sew the sections together. You can pin it into place over here if you'd like but I just held it.
Start appliqueing along the inside edge, lining up the edge of the handle strip with the marking on the background fabric.

Applique along the entire inside edge and finish off.

Now carefully trim the seam allowance to about 1/8" from the stitching.

Trim the seam allowance on the opposite side to about 1/4" outside the finger pressed line. You can trim it a little narrower or wider too. Just make sure the seam allowance is smaller than the width of the applique, in this case 3/8".


You will now have all three block sections.


good job! nice pastel color.
ReplyDeleteKaren
http://karensquilting.com/blog/
Great explanation and I love the pastel colour. Thanks for sharing
ReplyDeleteSweet block! I will be redoing this block....I'll think about trying this technique. Happy Mother's Day!
ReplyDeleteI enjoyed trying this applique technique. It went pretty easy and came out smooth.
ReplyDelete