C-5 Eye of the Cyclone
Showing posts with label dear jane. Show all posts
Monday, June 6, 2016
Thursday, September 3, 2015
Pinning
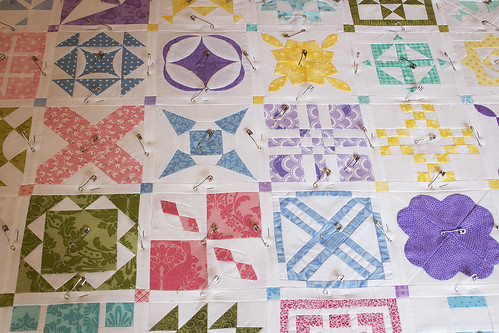
The quilt is pinned! It's still taped to the floor because I have a couple of tiny blood drops I have to try and remove. It's not really a quilt until you've bled on it, right?
I had to make THREE pin runs (actually 4 because one time I forgot my wallet at home and had to go back to fetch it) before I had enough pins for this quilt. It's the biggest quilt I've ever made!
So, how many pins do you need for a Dear Jane® quilt? Somewhere between 800 and 1,000 depending on how much pinning you do.
I pinned once in the sashing surrounding each block and once in the center of each block. I hope it's enough!

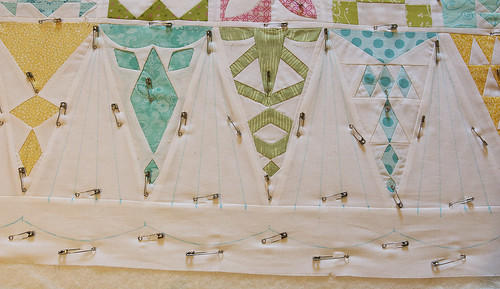
And here's how I pinned the triangles and scallops:

Off to go try some stain removal techniques.
I had to make THREE pin runs (actually 4 because one time I forgot my wallet at home and had to go back to fetch it) before I had enough pins for this quilt. It's the biggest quilt I've ever made!
So, how many pins do you need for a Dear Jane® quilt? Somewhere between 800 and 1,000 depending on how much pinning you do.
I pinned once in the sashing surrounding each block and once in the center of each block. I hope it's enough!

And here's how I pinned the triangles and scallops:

Off to go try some stain removal techniques.
Thursday, October 14, 2010
TLC - Top Left Corner
The top left corner. Corners are 8" x 8" finished.
Sew the hexagons together in groups of three.
Sew these groups together.
Cut a 6" x 6" square out of background fabric and baste the hexagon section to the right side of the square.
Applique along all the folded edges. Remove the basting stitches, machine stitches, and freezer paper. Trim the square to 5 1/8" x 5 1/8".
Print or trace the block diagram onto the dull side of freezer paper and cut out the hexagons.
Iron nine of the hexagons to the wrong side of main block fabric and trim all the seam allowances to exactly 1/4".
Fold all seam allowances over to the wrong side and secure with a couple machine stitches. Do not use too many stitches. You are going to have to undo these at the end.Sew the hexagons together in groups of three.
Sew these groups together.
Cut a 6" x 6" square out of background fabric and baste the hexagon section to the right side of the square.
Applique along all the folded edges. Remove the basting stitches, machine stitches, and freezer paper. Trim the square to 5 1/8" x 5 1/8".
Print or trace the block diagram onto foundation paper, number, and cut out the section below.
Foundation piece and trim seam allowances to 1/4". Cut the remaining section out of background fabric. Remember to add 1/4" seam allowances.Sew the non-pieced section to the bottom of the main block section.
Sew the pieced section to the side.
Out of background fabric, cut two strips 7/8" x 7".
Referring to the block diagram, attach the strips to two of the block's sides.
I found the easiest way to do this is to attach each strip and then trim it to size on both ends.
Applique the remaining hexagon onto the block.
Labels:
block,
block instructions,
corner,
dear jane,
dear jane block tutorial,
how to,
quilt,
tlc,
top left corner
Tuesday, October 12, 2010
RS-3
5 blocks to go!!!
Cut two 2.5" x 2.5" squares out of main block fabric.
Cut two 2.5" x 2.5" squares out of background fabric.
Draw a diagonal line corner to corner on the wrong side of two of the squares.
Sew squares together in pairs 1/4" from the diagonal lines on each side.
Cut apart on the drawn lines and press open.
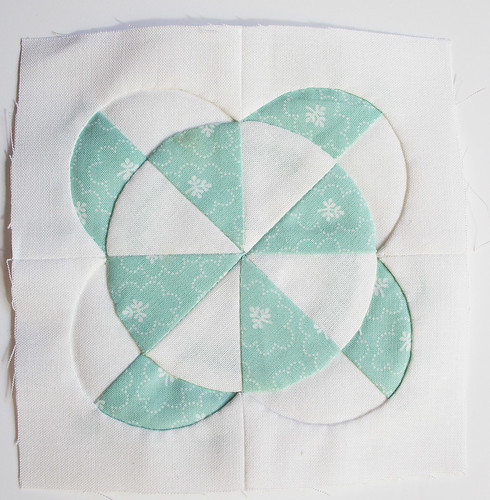
Lay out as below and sew together to form a pinwheel. (I forgot to take a photo of the actual pinwheel.)
Trace or print the block diagram onto foundation paper and number as below. The center will be sewn as one piece.
Foundation piece as below. Trim the seam allowance to 1/4"
Print or trace the block diagram onto the dull side of freezer paper and cut out the shapes as in the photo.
Iron the melon shapes onto the right side of your main block fabric and cut out. Leave about 3/8" seam allowance along one curved edge and at least 1/2" at the bottom and sides. I left at least an inch.
Iron the center freezer paper shape to the right side of the pinwheel you constructed earlier, lining up the seam lines.
Place one of the melon sections right side up on the pinwheel, aligning the curved edges on both freezer paper cutouts. A light table or bright window will be very helpful when doing this. Baste through all layers.
Applique along the curved edge, turning under the seam allowance. Remove the freezer paper melon and press.
Repeat for the other three melons.
Applique the small triangle to the foundation pieced block section. Note that you only have to applique the sides of the triangle. The bottom will be in the seam allowance.
Trace the center circle onto the dull side of freezer paper and cut out, leaving a "frame" of at least 1/4" all around.
Iron the freezer paper into position on the right side of the block and cut out, leaving a seam allowance for turning under.
Place the appliqued block section right side up on the table. Carefully position the block over it. Baste through all layers.
Clip the curved edge every 1/4" to 1/2". Applique along the curved edge.
Remove the freezer paper, press, and trim away the excess fabric from the back of the block.
Cut two 2.5" x 2.5" squares out of main block fabric.
Cut two 2.5" x 2.5" squares out of background fabric.
Draw a diagonal line corner to corner on the wrong side of two of the squares.
Sew squares together in pairs 1/4" from the diagonal lines on each side.
Cut apart on the drawn lines and press open.
Lay out as below and sew together to form a pinwheel. (I forgot to take a photo of the actual pinwheel.)
Trace or print the block diagram onto foundation paper and number as below. The center will be sewn as one piece.
Foundation piece as below. Trim the seam allowance to 1/4"
Print or trace the block diagram onto the dull side of freezer paper and cut out the shapes as in the photo.
Iron the melon shapes onto the right side of your main block fabric and cut out. Leave about 3/8" seam allowance along one curved edge and at least 1/2" at the bottom and sides. I left at least an inch.
Iron the center freezer paper shape to the right side of the pinwheel you constructed earlier, lining up the seam lines.
Place one of the melon sections right side up on the pinwheel, aligning the curved edges on both freezer paper cutouts. A light table or bright window will be very helpful when doing this. Baste through all layers.
Applique along the curved edge, turning under the seam allowance. Remove the freezer paper melon and press.
Repeat for the other three melons.
Applique the small triangle to the foundation pieced block section. Note that you only have to applique the sides of the triangle. The bottom will be in the seam allowance.
Trace the center circle onto the dull side of freezer paper and cut out, leaving a "frame" of at least 1/4" all around.
Iron the freezer paper into position on the right side of the block and cut out, leaving a seam allowance for turning under.
Place the appliqued block section right side up on the table. Carefully position the block over it. Baste through all layers.
Clip the curved edge every 1/4" to 1/2". Applique along the curved edge.
Remove the freezer paper, press, and trim away the excess fabric from the back of the block.
Applique the three kites onto the block.
Cut a 7/8" by 6" strip of main block fabric and sew it to the bottom of the block. Trim to size.
Labels:
block,
block instructions,
dear jane,
dear jane block tutorial,
how to,
quilt,
rs-3,
rs3
Wednesday, October 6, 2010
LS-7
I'm making blocks at night now so the photos may not be of the best quality. I apologize for this. I'm trying really hard to get all the blocks done ASAP.
Print or trace the block diagram onto foundation paper, number, and cut out the sections as below. Note that I extended a seam line in the top section to allow for it to be pieced rather than appliqued.
Following the numbers, foundation piece each section and trim all seam allowances to 1/4".Print or trace the center block section (see below) onto the dull side of freezer paper and cut out as in the photo.
Cut a 5" x 6" square out of background fabric and iron the freezer paper to the right side of the fabric.
Cut out the center shape leaving a seam allowance to turn under when you applique.
Clip the seams on the inside curves.
Cut a 5" x 6" square out of main block fabric and lay it right side up on the table. Place the background fabric section right side up on top of it. Baste through all layers.
Turning the seam allowance under, applique along the inner edges of the inner shape.
Trim the section to size (1/4" outside the freezer paper edges), remove the basting and freezer paper.
Sew the four block sections together.
Using your preferred applique method, applique the two melons onto the block.
Monday, October 4, 2010
K-6
Print or trace the block diagram onto foundation paper, number, and cut out as in the photo.
Foundation piece all sections and trim seam allowances to 1/4"
Sew together the two center sections.
Sew together the three sections making up the block center.
Attach the side sections.
Finally attach the top and bottom sections.
This block is not as wonky as it looks. It just wouldn't lay flat for a photo.
Foundation piece all sections and trim seam allowances to 1/4"
Sew together the two center sections.
Sew together the three sections making up the block center.
Attach the side sections.
Finally attach the top and bottom sections.
This block is not as wonky as it looks. It just wouldn't lay flat for a photo.
Labels:
block,
block instructions,
dear jane,
dear jane block tutorial,
how to,
k-6,
k6,
quilt
Saturday, October 2, 2010
K-5
On a roll now...
Print or trace the block diagram into the dull side of freezer paper and cut out the sections as in the photo below.
Cut two squares 3 1/2" x 3 1/2" out of background fabric.
Cut a 1 1/2" wide by 10" long strip out of background fabric.
Using these strips cut four 60 degree parallelograms about 2" long out of each strip. I think most rulers have 60 degree markings.
Refer to the block diagram to make sure your sides angle in the right direction.
Remove the freezer paper and cut away the excess fabric from the back of each section.
Out of main block fabric cut two squares 2 3/4" x 2 3/4".
Sew the four sections into a four patch block.
Print or trace the block diagram into the dull side of freezer paper and cut out the sections as in the photo below.
Cut two squares 3 1/2" x 3 1/2" out of background fabric.
Iron the freezer paper sections to the right side of the background fabric squares and cut out the inside of the kites, leaving a seam allowance for turning under.
Cut a 1 1/2" wide by 10" long strip out of main block fabric.Cut a 1 1/2" wide by 10" long strip out of background fabric.
Using these strips cut four 60 degree parallelograms about 2" long out of each strip. I think most rulers have 60 degree markings.
Refer to the block diagram to make sure your sides angle in the right direction.
Make two "four patches" out of the shapes. Make sure to check the block diagram. I made my first set incorrectly.
Lay the background fabric block sections right side up on top of the "four patches", centering them carefully. A window or lightbox is really handy.
Baste through all layers. Clip the sharp inside corners.
Reverse applique the kite shapes.
Trim the block sections to 2 3/4" x 2 3/4" each. If you trim 1/4" outside the freezer paper edges, you'll have the correct size square.Remove the freezer paper and cut away the excess fabric from the back of each section.
Out of main block fabric cut two squares 2 3/4" x 2 3/4".
Sew the four sections into a four patch block.
Labels:
block,
block instructions,
dear jane,
dear jane block tutorial,
how to,
k-5,
k5
Subscribe to:
Posts (Atom)