Sunday, November 29, 2009

RS-10

I spent the weekend trying to catch on my two active Janes.  In case you didn't know, this is a very, very time consuming project.  I need at least one more Thanksgiving weekend.
On to the block...

Trace or print the block diagram onto foundation paper, number, and cut out the top three sections of the block as in the photo.


Foundation piece each section and trim all seam allowances to 1/4".


Cut a piece of main block fabric about 5" x 7". Mark the positions of the background fabric pieces in the bottom block section on the fabric and applique into position.  Cut out the block section leaving 1/4" seam allowances.

Referring to the block diagram, sew the four block sections together.
RS-10

Tuesday, November 24, 2009

H-2

I've implemented some inset seam avoidance here again.

Print or trace the block diagram onto foundation paper, number, and cut out as in the photo.


Foundation piece each section, following the numbers.
Trim the seam allowances to 1/4".
Cut the two unnumbered sections out of background fabric, remembering to add 1/4" seam allowance.
I cut the pattern piece out of freezer paper and iron it to the wrong side of my fabric, then cut out the shape, adding the seam allowance.


Referring to the block diagram, sew the three pieced sections together.


Lay a non-pieced section right sides together with the block, and sew the short seam.  Note that I stopped the seam a 1/4" from the edge, i.e. where the seam meets up with the seam line of the long edge.


Repeat for the other side seam.
Press.


Using a disappearing marker, draw a line 1/4" in from the long edge as in the photo.  This marks the seam line.


Fold the fabric under along this line and press.


Applique in place.
Repeat for the other non-pieced section.


Applique the small triangles into place.
H-2

Wednesday, November 18, 2009

H-3

I'm trying to catch up...
Is it me or are the blocks getting easier and easier?

Print or trace the block diagram onto foundation paper, number, and cut out as in the photo.
I mirrored the block because I wasn't sure whether it should be or not. I have the software, so mirroring blocks is no problem. If the block didn't need to be mirrored it doesn't make a difference anyway.


Foundation piece the four block sections following the numbers, and trim the seam allowances to 1/4".


Sew the two center block sections together.


Attach the top and bottom sections.
Voila!
H-3

Sunday, November 15, 2009

G-10

I snuck a block in before it got too dark to take photos.

Foundation pieced.
Print or trace the block diagram onto foundation paper, number, and cut out as in the photo.


Following the numbers, foundation piece each section of the block.  Trim the seam allowances to 1/4".

Referring to the block diagram, sew the pieced sections together.
If you start with the outside sections and work inwards, you will see where the seams should be aligned.
G-10

Thursday, November 12, 2009

Feeling guilty

I feel very bad about not posting blocks regularly.
I promise this blog is still around and I'm hoping to get some blocks up today or tomorrow.

Friday, November 6, 2009

J-9

I had this block all finished except for the applique. It got dark while I was trying to get that done so I could post a block on time for a change. Darn.

Out of background fabric, cut:
two strips 1 1/8" x 2.5"
two strips 1 1/8" x 3.75"

Out of main block fabric, cut:
one square 2.5" x 2.5"
one strip 1 1/8" x 3.75"
two strips 1 1/8" x 4 3/8"
one strip 1 1/8" x 5"
Sew a 1 1/8" x 2.5" background fabric strip to the top and bottom of the main fabric square.

Sew a 1 1/8" x 3.75" background fabric strip to each side of the resulting sections.

Sew the main fabric strips to this section log cabin style, starting with the shortest one on the top and moving clockwise.

Applique the four little melons into position.
J-9

Monday, November 2, 2009

L-6

Between the technical difficulties and the fact that it's dark by 3pm, it's been a challenge getting this little block done.

I know I skipped Thursday. I apologize and I will try to fit in an extra block or two over the next couple of weeks.

Print or trace the block diagram onto foundation paper, number, and cut out the center section of the block as in the photo.

Foundation piece all the numbered sections and trim their seam allowances to 1/4".

Referring to the block diagram, sew the side sections together, forming three block sections.


Sew these three sections together, completing the center section of the block.
Out of background fabric, cut:
One strip 3/4" x 4 1/4"
One strip 3/4" x 3 3/4"
Two strips 3/4" x 4"


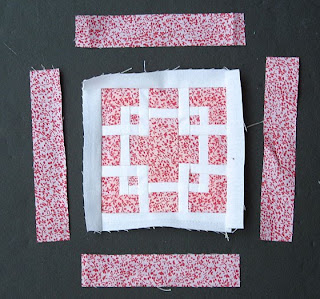
Referring to the block diagram sew these strips to the outside of the block log cabin style, starting with the shortest one and attaching them in clockwise order.

Out of main block fabric, cut:
One strip 7/8" x 5"
Two strips 7/8" 4 5/8"
One strip 7/8" x 4 1/4"

Once again referring to the block diagram, sew these strips to the block, starting with the shortest one.
L-6

Sunday, November 1, 2009

Technical difficulties

Block instructions are on their way, I promise.
I'm having some photography issues but they'll be sorted out soon.