Tuesday, June 29, 2010

F-11

Yesterday I spent two hours making a block we've already made.
It felt familiar the whole time but because I'm making two quilts concurrently I thought it was just because if that. Darn.

Anyhow, here's a block we haven't made.

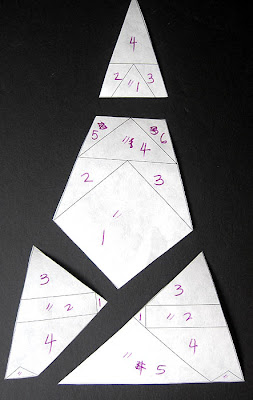
Print or trace the block diagram onto foundation paper, number, and cut out as in the photo.
Foundation piece the two block sections and trim the seam allowances to 1/4".
Sew the sections together.
Print or trace the block diagram onto the dull side of freezer paper and cut out the corner sections and small pie shapes. Keep the sections you cut out.
Iron the freezer paper to the right side of the block, lining up the seam lines.
Cut the small pie shapes out of the fabric, leaving a seam allowance to turn under.
Cut a 6" x 6" square out of background fabric and place it right side up of the table. Position the block right side up on top of it. Baste through all layers to secure the pie shapes. Leave room for the seam allowance to be turned under when you applique. Clip the inside corners and curves.
Turning under the seam allowances, applique the pie shapes.
Cut away the extra background fabric from the back of the block.
Out of background fabric, cut four squares 2.5" x 2.5".
Applique the quarter circle corner shapes onto each of them using the applique method you prefer. Make sure to leave enough background fabric around the curved edges. I recommend at least 1" to make sure you have fabric to trim off when you're done. If this doesn't make sense just keep reading and you'll hopefully understand.
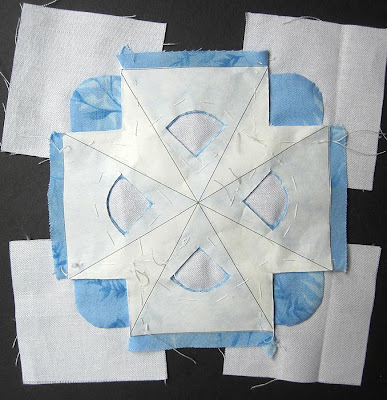
I used "freezer paper on top" applique, which is shown in the photos below.

Cut out the small curved sections from the freezer paper sections you saved earlier and iron them into place on the right side of the appliqued squares. (They may be a little wonky which is why it was a good idea to leave that 1" extra.)
Cut the corners out of the fabric on the main block, leaving seam allowances to be turned under.
Place an appliqued square right side up on the table. Lay the block right side up on top of it, using the freezer paper on both sections to line them up. (Remember that the seam allowance on the main block will extend past the actual edge of the block so you'll have to peek under there to line up the two freezer paper edges.)
Baste through all layers.
Applique.
Repeat for the other three block corners.
Trim the block to 5" square, using the freezer paper edges as a guide.
Remove all the freezer paper, trim the excess fabric from the back, and press.
F-11
And that will do it for row F, which means we now have the first 6 rows completed.

Tuesday, June 22, 2010

F-9

Finally! I have a block made. I'm never going to make my goal if I don't speed up this progress.

Cut a 6" x 6" square out of background fabric and cut it in half on the diagonal twice.
Sew the triangles together in pairs.
Sew the two resulting pieced triangles together.
(Press all seams open.)
Print or trace the block diagram onto the dull side of freezer paper and cut out as in the photo.
Iron the freezer paper template to the right side of the background fabric block section, centering it carefully and matching up the seam lines.
Cut out the center shape leaving a seam allowance.
Out of main block fabric, cut a 4" x 4" square. Lay the square right side up on the table and place the background fabric section right side up on top of it, centering it carefully.
Baste through all layers, far enough from the freezer paper edge to allow for the seam allowance to be turned under.
Applique. Because you pressed the seams open you should be able to undo the corner seams just a little and they will fold back to the wrong side easily.
Remove the freezer paper and press.
Mark the positions of the melons on the block and, using your favorite applique method, applique them in place on the block.
I used "freezer paper inside".
Trim the block to 5" x 5".
F-9

I'll be back soon!

I've been receiving concerned emails about the blog and the instructions.
Life is really hectic (actually upside down) right now but I have one block almost done.
I'm planning to post it today.
I'm not disappearing, I promise.

Friday, June 11, 2010

Answering your questions

I get a lot of questions in the comment section of posts.
Most of these comments do not have email addresses connected to them, leaving me unable to answer them.
I love answering quilters' questions so if you have one, please E-MAIL me and I promise I will respond. (My e-mail address is in the sidebar.)

BTW, who's up to date and has 200 blocks completed?
Just wondering...

And because no post can be without a photo, this little Valentine's Dear Jane by Trisha.

Thursday, June 10, 2010

TR-6

Yes, another triangle. Block number 200!

Print or trace the block diagram onto foundation paper, number, and cut out as in the photo.
Foundation piece each numbered section and trim the seam allowances to 1/4". Note that the top kite and melon are not pieced.
Sew the three center sections together.
Attach the top and bottom sections.
Print or trace the top block section onto the dull side of freezer paper and cut out the kite and melon shapes.
Iron this template to the right side of the block, lining up the seam lines.
Cut the melon and kite out of the fabric, leaving a small seam allowance. Clip the sharp corners and inside curves.
Cut a 3" x 3.5" rectangle out of main block fabric and lay it right side up on the table.
Place the block right side up on top of it.
Baste through all layers.
Turning under the seam allowances, reverse applique the kite and melon.
Trim the block to size, using the freezer paper as a guide.
Remove the freezer paper and press.
TR-6

Sunday, June 6, 2010

RS-13

Easy.

Print or trace the block pattern onto foundation paper, number, and cut out as in the photo.
Foundation piece the numbered sections. Trim the seam allowances to 1/4".
Note that we didn't piece the small triangles at the bottom of the block.

Sew together the two center sections of the block.
Attach the remaining two sections.
Print or trace the bottom block section onto the dull side of freezer paper and cut out as below.
Iron the freezer paper into position on the right side of the block, lining up the seam lines. Cut out the small triangles, leaving a small seam allowance. Clip the inside corners.
Out of main block fabric, cut a rectangle about 6" x 4" and lay it right side up on the table.
Place the block right side up on top of it.
Baste through all layers. Do not baste too close the the edges of the triangles because you want to be able to turn under the seam allowance in the next step.
Turning under the seam allowance, reverse applique the small triangles.
Trim to size, remove the freezer paper, and cut away the excess fabric from the back of the block.
Press.
RS-13