No, it's still not "that block".
This one is really cute.
Foundation pieced. If this was a bigger blog I would definitely piece it traditionally but because of the size I went with FP again.
Print or trace the block diagram onto foundation paper. Number and cut out as in the photo.
Foundation piece all the numbered sections and trim the seam allowances to ¼". Cut the unnumbered pieces out of fabric leaving a ¼" seam allowance as well.
Sew together the center section.
Attach the side triangles.
Sew on the side strips log cabin style following the diagram.
So cute!
Monday, February 23, 2009
K-1
Foundation pieced.
Print or trace the block diagram onto foundation paper. Number and cut out as in the photo.
NB! You have to mirror the diagram.
Foundation piece the numbered sections and trim, leaving a ¼" seam allowance all around. Cut the unnumbered pieces out of fabric leaving a ¼" seam allowance as well.
Assemble the center section of the block by sewing together the five center strips.
Attach the side strips log cabin style, following the block diagram.
Thursday, February 19, 2009
BR-13
As expected, a very complicated block finally came out of the jar yesterday. After five hours of sewing and "un"-sewing, I completed the block. It was a TOTAL disaster. The upside is that I think I now know both how NOT to do it and hopefully how to do it better.
After all that drama I needed some simple block therapy, hence today's block.
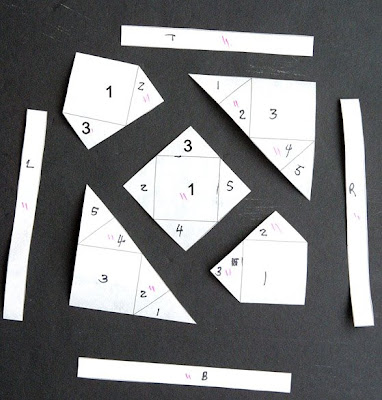
Print or trace the block diagram onto foundation paper, number, and cut out as in the photo.
Foundation piece all the numbered sections. Trim the seam allowances to ¼" all around. Cut the unnumbered sections out of fabric, leaving a ¼" seam allowance as well.
Assemble the "diamond" section by sewing all four sections together.
Attach the triangle and trapezoid sections to the top and bottom.
Sew on the side strips.
Attach the small triangle section to the top.
Tuesday, February 17, 2009
Rainbow Jane
Even though she's not part of this group, Rainbow Jane is close to my heart.
The second month's kits went out last week and when all the blocks are made, this can be completed:
We also have five triangles, but unfortunately they will have to wait a bit to be sewn into the quilt.
The second month's kits went out last week and when all the blocks are made, this can be completed:
We also have five triangles, but unfortunately they will have to wait a bit to be sewn into the quilt.
Monday, February 16, 2009
L-7
Another easy one. I think if the jar won't give us a hard one or two, I'll have to choose one...
Trace or print the block diagram onto foundation paper, number and cut out as in the photo.
Foundation piece each numbered section. Trim the seam allowances to ¼" all around.
Referring to the diagram, sew the three sections together.
Trace or print the block diagram onto foundation paper, number and cut out as in the photo.
Foundation piece each numbered section. Trim the seam allowances to ¼" all around.
Referring to the diagram, sew the three sections together.
Thursday, February 12, 2009
J-7
I figured this one would not turn out any better foundation pieced that pieced "normally", so I decided to change it up and rotary cut for a change.
Out of background fabric cut:
1 strip 9" x 1"
2 strips 5" x 1"
5 squares 2" x 2"
Out of "main" fabric cut:
2 strips 9" x 1"
1 strip 5" x 1"
Sew the strips together along the long edges as in the following photo. Press after each seam.
Cut the long strip into eight 1" x 2" strips.
Cut the short strip into four 1" x 2" strips.
Sew the little strips in sets of three into squares as in the photo.
Referring to the block diagram, sew the white squares to the pieced squares to form three strips.
Sew the strips together and press.
A little wonky but done is better than perfect...
(Did you see I have pre-cut freezer paper sheets in the store now? So much easier, and they won't jam up your printer.)
Monday, February 9, 2009
F-3
Foundation pieced and easy.
Print or trace the block diagram onto foundation paper, number, and cut out as in the photo.
Foundation piece the numbered sections and trim the seam allowances to ¼". Cut out the unnumbered strips, leaving ¼" seam allowances as well.
Sew on the side strips.
Sew on the top and bottom sections.
I have a feeling this "easy streak" is going to end soon.
Thursday, February 5, 2009
I-2
An easy one. It could definitely be strip pieced but my mind just goes straight to foundation piecing these days.
Print or trace the block diagram onto foundation paper, number, and cut out as in the photo.
Foundation piece the numbered sections and trim the seam allowances to ¼". Cut out the unnumbered triangles, leaving ¼" seam allowances as well.
Sew the three center sections together as in the photo, lining up the seams carefully.
Attach the side triangles.
Monday, February 2, 2009
RS-4
Foundation pieced. The shapes in this one were kind of strange. I used a lot of fabric.
Trace or print the block diagram onto foundation paper.
Important! You have to mirror this diagram to get the block to turn out correctly.
Also important! If you're printing from the software don't forget to change the block size to 5" x 8".
Number the sections as in the photo and cut out.
Foundation piece the two numbered sections. Trim the seam allowances to ¼".
Sew the two sections together.
Very, very easy. (And cute)
Subscribe to:
Posts (Atom)